Most of the time, decorating one’s room or home space can be a struggle. It’s hard to find adornments that are both cheap and trendy. Luckily, this is where Do It Yourself projects, DIYs, come in handy. Listed below are six different projects that can be made with materials that may already be lying around your home, such as old t-shirts, glue, or nail polish.
Frame key-holder
A frame key-holder is both practical and cute. All that you need for this project is a small picture frame (3.5×5 inch frame is recommended), 3 to 4 ceiling screws, and keys to hang.
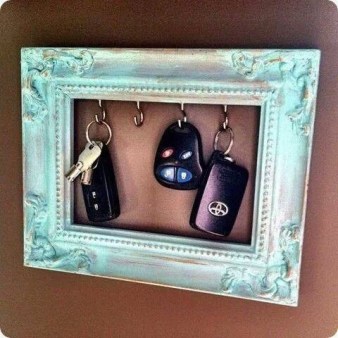
(photo courtesy of www.purplecarrotkc.com)
- To install the ceiling screws into the picture frame, drill a hole into the wood of the frame where the hook will go. Make sure this hole is a little smaller than the circumference of the ceiling screw.
- Install the hooks by hand or attach to a low speed drill and drill upwards into the frame. If the wood of the frame is pliant enough, the hooks might be able to be installed without drilling holes into the wood beforehand. The hang your keys for easy and attractive access.
Marbled mugs
Classy mugs are normally pricier than plain mugs, but why not make your own classy mug out of cheap, boring, white mugs? Using any mug of your choice, a bottle of nail polish, warm water, a wooden dowel or toothpick, and a finishing spray, you can create a simple, but beautiful mug.
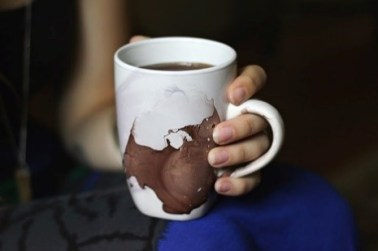
(photo courtesy of www.poppytalk.com)
(photo courtesy of www.babble.com)
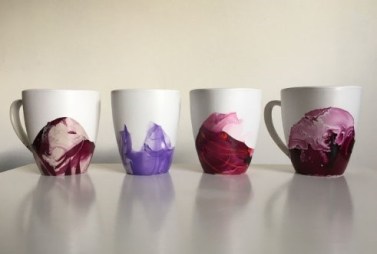
- To make these mugs, fill a medium sized bowl with warm water.
- Drizzle or pour nail polish into the water however you prefer.
- If you want to arrange the nail polish in any way, quickly use a wooden dowel or toothpick to move around the nail polish in the water. If this step is not done quickly, the nail polish will dry on top of the water and clump around the mixing instrument.
- Dip the mug into the water and rotate as if you were swirling liquid inside of the mug.
- Depending on how you want your mug to look, either use your mixing instrument to collect the excess nail polish on top of the water and remove it before you take the mug out, or leave the polish and directly pull the mug out of the water. If the excess nail polish is left in the bowl, it will be added to the design on the mug as it is extracted from the water.
- Use acetone or nail polish remover to take off the design if you don’t like how it looks. Let the mug sit undisturbed for 2 to 5 hours to dry and use a finishing spray or varnish to make sure the design lasts. Hand-washing is recommended.
Tapestry
Tapestries are a great way to adorn a room if painting is too much of a hassle. Tapestries come in a multitude of styles, displaying nature, geometric designs, mandala, and so much more. For this tapestry, the only materials needed are a bedsheet or large fabric of any kind of any color, acrylic paint of your choice, scissors, a ruler, and a moderately sized sponge.

(photo courtesy of www.designsponge.com)
- To make this tapestry, smooth out a large piece of cloth.
- Use a ruler to mark every 3 inches along each side of the cloth with a pencil or a washable marker. Make a grid with these marks by connecting the scores on one side of the cloth to the scores on the other side of the cloth.
- Take the household sponge and cut out an equilateral triangle with 3 inch sides.
- Pour out the paint onto a tray to stamp the sponge into or use a paintbrush to brush the paint onto the sponge.
- Align the sponge with a grid square on the cloth and stamp down. Repeat on the next grid square and continue until there is no paint left on the sponge. Use more or less paint to your preference and continue until each grid square is painted.
- Let dry for 3-5 hours before washing. Washing with cold water or handwashing is recommended. You can make different designs by changing the size of your grid or the shape of your sponge.
Fabric Cork Board/Jewelry Hanger
It can sometimes be hard to figure out what to do with corkboards. The obvious choice is to fill the board up with important and relevant information, but where’s the fun in that? This is a stylish idea that not only displays your jewelry, but can eliminate the clutter of a jewelry box. To make this cork board turned jewelry hanger, gather together fabric of any style, t-pins or a stapler, and thumbtacks. Acrylic paint complimentary to the fabric is optional.
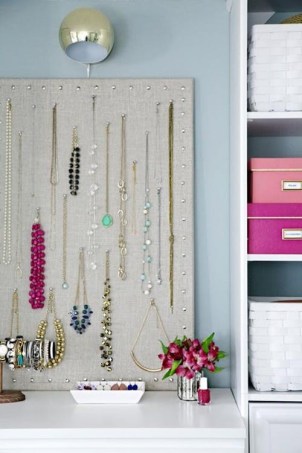
(photo courtesy of www.iheartorganizing.com)
There are two ways to make this frame. One is to cover the whole cork board in fabric.
- To do this, lay out your fabric of choice on a flat surface with the printed side down.
- Place the cork board face down on top of the fabric so at least 1½ inches of fabric are showing on each side. Trim down the fabric if it exceeds this length.
- Fold the fabric over the board tightly and staple evenly onto the cork board.
- Continue step 3 on the side opposite of the completed portion, stretching the fabric tightly over the board. Do the third and fourth sides in the same fashion. Once this part is complete, all the cork board needs are thumbtacks and jewelry!
Another way to make this jewelry hanger cork board is to pin down the fabric so that the border of the cork board is displayed. Painting the border is optional, but if desired, this has to be done first.
- Measure the inside edges of the border and cut fabric to size.
- Use t-pins or staples to pin fabric into place. These can be painted as well or bought in a nondescript color.
- Once the fabric is fastened into place, start sticking on your jewelry! Finishing spray can be used on the border of the cork board to help the paint last.
Braided T-Shirt Rug
Sometimes it can be hard to let go of old t-shirts. They may have stains and holes so they can’t be donated, or they may have sentimental value but are too small to wear any longer. One way to get rid of clutter but still keep the memories the t-shirts hold are to turn them into a rug! To make this braided t-shirt rug, gather together 12-15 t-shirts, depending on the desired rug size, scissors, and three safety pin (this is optional).

(photo courtesy of www.dosmallthingswithlove.com)
- To make this rug, cut the t-shirts in half by front and back so that the pieces are mirror versions of each other.


- Cut the fabric horizontally into 2 inch strips. Knot three strips together, preferably different colors, depending on the pattern desired.


- Start braiding these three strips, positioning the braided parts into a spiral as you go along.


- Once the spiral is long enough that the beginning knot touches the braided part of the t-shirt strips, start merging the rug together: loop one strip of the three stranded braid into the completed part of the rug, pull through, and braid the three strands once through.
- This step may be completed easier if a safety pin is attached to the bottom of each strand. The safety pin can be used in the same fashion as a sewing needle to navigate through the strands of the braid and pull through.


- Continue in the same fashion until you run out of cloth to braid. To continue, knot on three more strands either individually or as a group, and repeat the steps above.


- When the rug reaches the desired length, either knot the strands together once more to end the rug and to make sure that the rug doesn’t fall apart, or use strong glue to plaster the ends of the rug to the face down side.
An optional step is to coat the tips of the end strips with a couple coats of clear nail polish to prevent fraying.
